Sunday, July 24, 2016

Paint Along 9: 3rd Coat of Paint


Have you let the first two coats dry/cure for a full week?  Good for you.

Slapping on the third coat is just the same as the first two coats, but there are some additional things to do before you get to that.

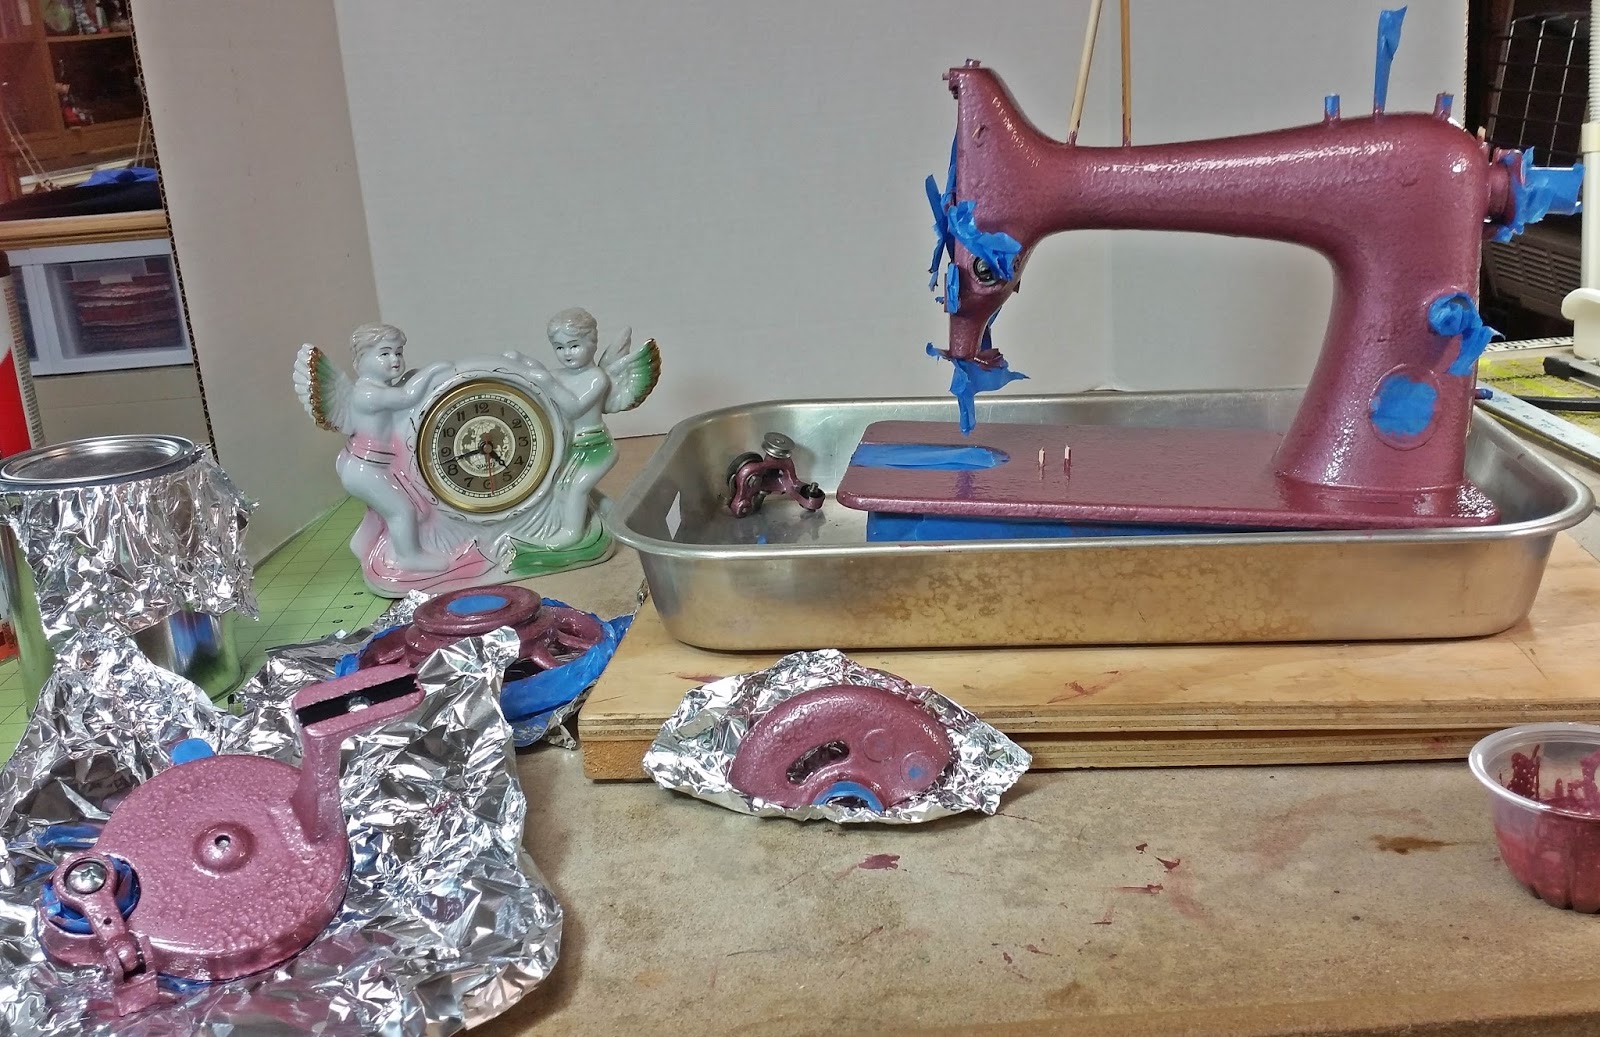
The two coats that are on there now have depth and dimension.  You have painted over painters tape and painted right up to and around the toothpicks and wood skewers that are blocking the holes in the machine.  What you have to do now is carefully disconnect those objects from the paint before adding even more depth and dimension.


The tool to do this is something skinny and sharp.  An exacto knife is good, as is a medical scalpel.  I was lucky enough to find a box of scalpels at a thrift store.  They make dandy seam rippers too.


Run the razor sharp exacto knife or scalpel around the base of the stick, or the perimeter of the tape to be removed.


Then carefully peel it away.


In the photo below you can see that there are some tiny areas where the black paint still shows.  I took my smallest paint brush and filled in these areas.


and in the photo below you can see that this covered things pretty well.  This particular gold logo is sticking out from the machine a bit.  An earlier Singer that I painted had a logo that hugged the machine much better.


Also in the photo above you can see that the area around the stitch length knob didn't get covered with the first two coats of paint.  But I've got it covered now!

I removed all of the bits of tape and toothpicks, etc.


In the photo below you can see that even with careful scalpel-ing a ridge of paint is standing up from the surface.


Even after a week of curing it is still soft enough** for me to press down the projections with the back of my fingernail.  I also did this with a couple of boogers that had escaped my notice last week.  **remember this!  we will talk about it more at the end.


After pressing down the paint it was then obstructing the hole (where the presser foot pressure regulator will go).


Dr. Scalpel cleaned it up nicely.

Nice and clean now.


You are probably wondering why the heck I bothered with the tape at all if I then take it off and have to clean up behind it.  I used the tape to keep paint out of the screw threads in some of these holes, and to keep paint from dripping into the guts of the machine.

and now it is time for my constant reminder to you
I AM NOT AN EXPERT.  I AM MAKING ALL OF THIS UP AS I GO ALONG.
The purpose of this blog is not to set myself up as the guru of all things sewing machine-y.  It is for me to share my experiments with you and hopefully show you that I am having fun and if it looks like fun to you, you should try it too.

So please feel free to jump in at all times with your own experiences and if you have another way of doing things, share it in the comments section.

When I removed the tape from the hand wheel I could see that I had not done of very good job of burnishing the tape down to the wheel.  Paint had bled under the painters tape.


Scalpel to the rescue again.


Keep in mind that you do all of this BEFORE putting on the third coat of paint.

Eleanor has written in from Sydney where it is cold, compared to the steaming soggy heat here.  She is repainting a crinkle finish Husqvarna and has decided on hammered copper.  I will show more of her pictures in a future post, but right now I want to share her brilliant method for dealing with the hand wheel.


I did not replace all of the tape and sticks before the third coat.  I used the usual tiny paintbrush to touch up any areas around the openings.  Then I used a small paintbrush to put on the third coat.  See the last post for all the special techniques for using xylene and hammered paint.

I did not see any need to apply a fourth coat, but I DID go over the whole thing very carefully (after it had dried to the touch) looking for any areas where extremely small bits of black paint still showed.  Hit those with the tiny paintbrush.


And that concludes the paint job.  Now we wait at least ANOTHER FULL WEEK before proceeding with the decals.  Remember that it is still somewhat soft and pliable now?  That's why you can smash the boogers flat with your fingernail.  This means that THE PAINT HAS NOT FULLY CURED.  Ms. Rhymes-With-Tequila wrote in on the last post to say
"And after the third coat goes on, wait at least another week for the paint to cure! Ask me how I know... Let's just say there was some repainting involved. This time (my second repaint) I waited a full month after the 3rd coat!"
implying that she ended up needing four coats.  Mine didn't need four.  But the warning is a good one.


Looking good, don't you think?  It has been a lot of fun so far (except for the guilt over all the delays.  but we are on a roll now).


Next step will be the water slide decals and the clear coat.  I did have plans for experimenting with something unusual (which you will still probably see on my next machine).  But in the end I decided to play it safe and ordered some decals on eBay.

I have gotten four sets of decals from Keeler Sales.

  • First set:  I paid for a set of flat gold Tiffany style decals and put them on a Singer 27 that I painted a sparkly blue.  
  • Second set:  I bought a set of 301 decals and replaced just the worn bed decals on an otherwise great machine.
  • Third set:  I assisted Keeler Sales in the development of a decal set for the Singer VSII fiddlebase, and in return for my help they gave me a set of decals.
  • Fourth set:  I bought a set for a Willcox and Gibbs, have not applied them yet.
Absolutely no problems whatsoever with the Keeler Sales decals.

I also made my own black water slide decals that I used on a Domestic high arm fiddlebase that I painted with copper hammered Rustoleum.  No problems with that either.  Follow the link if you want to see the techniques and material sources for this.

When I looked on eBay this time I found another seller who is NOT doing reproduction Singer decals, but IS creating their own designs in the spirit of, and meant to be applied to, antique Singers.  I liked one of the patterns and bought a set.  In the next post we will discover how well they work--or not.  But water slide decals are easy to make and easy to apply, so I am expecting success.

There is at least one more seller of Singer decals on eBay but I have not tried their products yet.

A few final comments on reproduction decals.  They do NOT have the shading that the originals have.  The flat gold is all one color with no shading.  They are pretty but they are not going to look like the originals.  This does not matter to me.  Pretty is good enough.  I have not tried any of the colored decals, but I hope to in the (distant) future.

So get your decals ready and meet me back here next week!

Tuesday, July 19, 2016

Paint Along 8: First two coats of paint


80% of the time you spend on a paint job should be spent in prepping the surface to receive (and ultimately to hold on to) the paint.  And yes, this should NOT take 7 months.  but whatever, here we finally are.

If you are just joining us, take a look at the earlier posts on preparation.
Paint Along.  How It Works.

Hammered paint is a VERY different beast than regular oil based paint and requires some specific techniques.  So read the whole post before opening that can of paint, please.

And start by reading the fine print on the paint can AND BELIEVING IT.  Trust me, it can all go horribly wrong if you don't.

But don't let any of these warnings scare you.  If you follow along, the paint will go on quickly (it HAS to go on quickly as you will see) and pretty easily.  Mistakes are fixable, and indeed on the first two coats mistakes won't really matter.  And the reason I recommend hammered paint for a first sewing machine painting experience is that it will cover a multitude of sins, ahem, chips and flaws.

I interviewed a friend with 43 years experience in the paint industry, and although I will publish that interview soon, today I am just going to thread his advice into this post.

Assemble your supplies


  • Paint.  I will experiment with three colors:  red and light blue Hammerite, and silver hammered Rustoleum.
    • if you are mixing colors you will also need a pallette on which to mix.  I used an aluminum stove burner cover.  I tend to turn the wrong burner on and crisp them, so I used one of those.
  • Paintbrushes.  I used one small one and one tiny one
  • Xylene.  NOTHING else will do.  I could only find it in a gallon can, which if I remember correctly cost about $20.

  • an empty paint can (necessary only if you are mixing colors).
  • an empty tin can 
  • some empty disposable small containers like yogurt cups, or fruit cups
  • glass of Southern sweet tea is optional!


and even more

  • Rustoleum wax and tar remover.  Probably not necessary if you move straight on from the earlier cleaning and sanding prep, but my machine had been sitting around for months and I felt it needed another wipe down before I began


and it did need the additional wipe down

  • paint stirrers
  • and that thingy that opens paint cans
  • aluminum foil (not shown in photos above)

"Witch Doctoring" and Paint Mixing

My friend the paint guru says that experimenting with mixing paints is called witch doctoring in the industry.  He stressed the importance of experimentation before beginning.  REALLY stressed it.


I ordered the paint online and it came with little clamps on the top.  pop those off and throw them away.  Yes, I AM going to go into this much detail.  So maybe you will need that glass of sweet tea after all.


I hate messy paint cans and it really is necessary for the can to seal tightly when you are finished.  So I made some covers out of aluminum foil to keep the top edges of the can clean.


Stir.  Stir.  Stir.  Stir.  Then stir some more.  Unless you just brought it home from the giant paint stirring machine at the paint store.


and below are my three stirred cans, with the lids sitting loosely back on the top.  This paint dries VERY quickly and you need to protect it from evaporating and thickening in the can.


I used the paint on the paint stirrers to drip some paint onto my stove-burner-cover-pallette.


And then used bamboo skewers to mix the colors.


I was hoping for purple.  The color you can see in the photo looks a lot better than it looked in person.   In person it had brown tones that were not attractive.  But the pink (half red Hammerite and half silver hammered Rustoleum) turned out very well.


I also tried mixing the red with artist's oil paint to get purple, but the amount of artist's oil needed would have been ridiculous, and I also assume (without confirming) that it would have changed the characteristics of the hammered paint.  


I have not tried mixing hammered with regular oil based paint for the same reason.  But that does not mean that you should not witch doctor some up.  If you do, send photos please, whether it worked or not.


and I slapped a sample on the back of the pillar


I also slapped on a sample of the light blue, which was pretty. But Nellie has asked for pink or purple.


So I liked the pink and the proportions were simple:  half red and half silver.  I used a couple of coffee scoops (because I had a surplus of those) to transfer about half a cup of each color into the empty paint can. I knew from experience that this would be PLENTY to paint one sewing machine.  It might, in fact, cover two.  Stir, stir, stir.

NOW HERE IS THE IMPORTANT STUFF ABOUT THE HAMMERED PAINT

Xylene is hugely toxic, not to mention explosive.  Mr. Paint Guru compared it to jet fuel.  
  • YOU MUST HAVE GOOD VENTILATION
    • outdoors is best, but the two windows with a strong fan and cross ventilation in my studio was approved by Mr. Paint Guru
  • YOU MUST NOT HAVE ANY OPEN FLAMES IN THE AREA
These things are non-negotiable.

Paint consists of pigment and a medium that carries it.  Hammered paint medium contains xylene (or something very similar) which dries VERY VERY QUICKLY.  You will have to battle this constantly while you work.


As you work, the paint will begin to dry on your paint brush.  If you allow this to happen you will get bits of dried paint showing up on the surface of your machine.  The technical term for the dried bits is "boogers".  I am not making this up.  Boogers, as you can imagine, are BAD.

So how do you prevent booger formation?  

First of all, don't work from your can of paint.  Instead, transfer a small amount (like one coffee scoop) into one of your small fruit cups (or whatever small container you are using) and then put the lid back on the paint can immediately. 


Take a small can (I used a tomato paste can), put a couple of tablespoons of xylene in the bottom of it and add a lid of aluminum foil


Before you start painting dip your brush into the xylene and brush the excess xylene off on the side of the can.

As you paint, dip your painty brush back into the xylene briefly from time to time.  I can't give you a formula for this.  The paint in the fruit cup is going to be drying and thickening just like the paint on the brush.  The xylene is going to thin the paint.  You are shooting for keeping the paint at the same consistency as you go along.  Too thick and you will start to get boogers.  Too thin and the paint will not be thick enough to cover up the chips in the bed of the original paint (if you have those).  

And if you do get a booger, dip the brush in the xylene and slap it on the booger, which will probably melt down.  Obvious drips can be treated the same way.

With all this in mind

Slap The First Coat of Paint On Quickly

And because I did, I don't have any pictures of this during the process.  I used a tiny brush to paint around the plugged up holes and a slightly larger brush for the rest of it.

The tiny brush had a plastic handle and I noticed that the xylene was melting it.  The slightly larger brush had a painted wooden handle and that survived just fine.

Mr. Paint Guru rcommends thinning the first coat a bit.  Again, no formula, but to the coffee scoop amount I probably added about a teaspoon.

THE FIRST COAT IS GOING TO LOOK TERRIBLE.  Don't worry about this.


The photos do not do justice to the terrible appearance of coat number one.


But in this close up of the bobbin winder you can see how spotty the first coat will look.


When you are finished with the first coat, DO NOT pour the leftovers back into the paint can.  Remember, this first coat was thinned down, and you don't want to thin down the paint in the can.  Also, the paint along the edges of the fruit cup are thick and boogery.  So, set that first cup aside for now (we will talk about disposal later).

Follow the directions on the can for the timing of applying the second coat.  I'm not going to tell you what it is because I want you to read those directions!  Basically you wait until the first coat is dry to the touch but still pliable, and you have a limited amount of time to add the second coat.  Take all of this very seriously.  Don't wait until the next day for instance.

Slap The Second Coat of Paint On Quickly

Get another fruit cup.  Put another coffee scoop of paint into it and don't thin it down.  But you will still have to keep your brush wet with the xylene as you did with the first coat.  

Same techniques as for first coat.  And although the second coat will look better, it will still not look terrific.  DO NOT WORRY ABOUT THIS.


Again, the photos look better than reality.  But if you look closely at the picture of the bed below, you will see little gaps where the original black is showing through.


I also painted the hand wheel, hand wheel guard, and reproduction hand crank.

After this second, full strength coat goes on, the small chips in the underlying paint job should be covered by the texture of the hammered paint.


Now I WILL tell you what to do between coat #2 and coat #3.  Wait a FULL WEEK.  Again, take this seriously.  In the upcoming interview with Mr. Paint Guru he will discuss what happens during this time while the paint is curing.  For now, just wait.  

Put the lids back on your paint cans and use a small hammer to securely close them.  

Disposal

You can clean the brushes or just throw them away.  I cleaned mine with the xylene in the tomato paste can and wiped them off on paper shop towels (a particularly heavy paper towel).  

This means that you have several things to throw away
  • the xylene-y paper towels
  • the xylene in the tomato paste can
  • the palette
  • the coffee scoops, or whatever you used to scoop the paint out of the original cans
  • the fruit cups, or whatever you used 
The only thing you will end up saving (and only if you really want to) is the tomato paste tin can.

Paper or cloth towels soaked with toxic and explosive chemicals WILL IGNITE ON THEIR OWN as chemical processes take place.  I've seen the videos of this.  

It is probably illegal and almost certainly a very environmentally unfriendly thing to do to toss the remaining 2 tablespoons of xylene in the tomato paste can out onto your back lawn.  So I am NOT going to confess to doing this.  Figure it out for yourself.

The xylene evaporated very quickly from the paper towels however.  I bagged all the refuse in a plastic bag, squeezed the air out of the bag, tied it off, and immediately took it to the outside trash can  Where it did not spontaneously combust nor burn my house down.  


Now just wait.  Really.  Don't try to cheat.  Wait the full week for the paint to cure.

See you next week for the final coats of paint.  I have done this and taken the photos already, so there is an excellent chance that I will get that post up in a very timely fashion.  


Friday, July 15, 2016

Paint Along 7: Actual Paint! from guest photographers


Bet you thought we would NEVER get to this point, where actual paint gets applied to actual machines.  I'm trying not to apologize too much for the train-wreck derailment of this paint along, but it is hard to restrain myself.  Hey, I'm an old lady (67 later this month, which is old for some and only middle aged for others) and have a lot of annoying but not serious issues.  Did you know, for example, that you can suddenly develop lactose intolerance? Took me 3 month to figure out what was going on, but once I nixed the dairy I experienced a miraculous recovery.  Enough of that, and back to the sewing machines.

Way way back last year when I actually started this paint along, two of my readers were kind enough to send photos of the machines they are working on.  They have undoubtedly been wondering when those photos would show up here.  Wonder no more!

Eleanor discovered that a kitty litter tray makes a great drip pan for sewing machine cleaning and painting.  Relatively cheap and easily available, too.


photo by Eleanor

She has a green Husqvarna with a crinkle finish.  She finds it hard to clean the crinkle.  I have had the same experience with black crinkle Singers and have the same discontent for the same reason.  Crinkle (also known as a Godzilla finish):  you either love it or hate it.


photo by Eleanor

photo by Eleanor
Below she demonstrates a method for removing a stubborn foot pressure controller.  for the best possible paint job it really is worth taking the time to remove every removeable bit from your machine


photo by Eleanor
Last time I heard from Eleanor (in January, yes I hang my head in shame for taking so long) she was planning to paint it red.  Please write in, Eleanor, and let us know how it is going.

**********

Ila has a very sad and pathetic looking Featherweight.  I broke my own rule of not challenging anything that anyone wants to do with THEIR OWN MACHINE and tried to talk her out of choosing this as her first machine to paint.  FWs have a lot of value and a good paint job only enhances that value. Hammered paint is not the traditional finish and I was worried about her doing something that would lower that value. Fortunately she ignored me.  When you see her machine you will realize that the value was nil in its previous condition.  Well, maybe not nil.  Even a decrepit FW has some value.

photo by Ila
Ila's FW is named Vyolette, after her husband's grandmother.  Lovely name.

photo by Ila
Although this looks fine to me, she was not satisfied with it and planned to do something else last time I heard from her.  How is it going, Ila?

******

and here at DragonPoodle Studio I have begun painting Nellie's Singer 99, which will be a lovely pink.  That post is coming SOON.  Maybe you are skeptical, having heard this before.  But the first two coats are on, and photos of that are already edited and ready to go.

Also coming:  an interview with my personal paint guru, Hugh Loftin, my late husband's BF, who has 43 years experience in the paint industry.  There is nothing about paint or the paint industry that he does not know.  And he revealed the mysteries of hammered paint for us.  Coming soon!