Saturday, January 31, 2015

VS2 Restoration: The Cabinet. And lots of off-topic tips.

Third in a series of posts about the complete restoration of an 1891 Singer Model VS2.

The last post covered applying new veneer, but before that could happen I had to remove the brass fittings in the cabinet top, and the wooden spindle (?) that holds the machine in place when you tip it back,


The brass bits were dirty, corroded, and sometimes full of detritus.

Treadle Belt hole


Two tabs on the back of the bonnet cover slide into the two corresponding slotted domes on the cabinet top.


The thing that holds the hinged pin that secures the machine head to the cabinet was surrounded by a rubber gasket.  It was a mess to remove, and I wondered how I would replace it.  But the attachment hinge itself was broken, so in the end it did not matter.

A few of the brass bits were missing, and I found a bag of VS2 brass fittings on eBay.  So now I have some extras for another project.  There is ALWAYS another project in the future.

By the way, a wire brush on the Dremel tool cleans all the gunk and corrosion off of metal parts brilliantly. I also used it on the metal sewing machine parts like the bobbin winder, the needle holder, the slide plates, etc.

The key to using the Dremel is to let the speed do all of the work, just apply it lightly and DO NOT USE FORCE.  I know this.  I remind myself of it every time I get the tool out.  And eventually I get all absorbed in the project and bear down.

If you are using a wire brush when you bear down, guess what happens?  The little wires break away and fly off.  If you are wearing a cashmere sweater, as I do every day in the winter, the little wires embed themselves in the cashmere.

Just in case you doubt that I wear cashmere every day, even when working on sewing machines, let me reveal my secret.  I buy all of my cashmere sweaters at thrift stores, where all the sweaters are the same price, around $3 to $4.  I have five of them now collected over a couple of years.  The men's sweaters are usually a thicker cashmere than the women's.  And a man's XL, with the sleeves rolled up, fits my magnificent figure very well.

So a couple of hours of this project involved picking tiny wires out of a cashmere sweater.  If it hadn't been cashmere I would have just thrown it away. I also scrupulously cleaned the area, not my favorite thing to do.  But I shudder to think of those tiny wires embedded in the tiny paws of my tiny elderly dog.  A couple of them embedded themselves in my own paws, not fun at all.

I bought a bunch of relatively cheap wire brushes online, but I know from sad experience that the brand name ones fly apart when abused also.  Another tip if you buy the cheap ones:  run a bead of super glue around the base of the brush where the wire tendrils attach.  I do think it helps, but it does not prevent user-stupidity.

I finished the metal polishing by setting up a work station surrounded by a large cardboard box, and wore a bright yellow lineman's raincoat over my cashmere sweater.  And here's yet another tip:  If you need a raincoat that is truly WATERPROOF and not just WATER RESISTANT, lot of luck if you are shopping women's fashions.  Go to your local hardware store and look for the raincoats that outdoor workers wear.  I think I paid $10 for mine, but that was a couple of decades ago.  I could have gotten matching pants too.  Wouldn't that be fashionable?

I persuaded the newly polished brass bits back into position.  Some of them needed more persuasion than others, and I used a scrap piece of wood on top of the brass and then tapped that wood piece with a small hammer.

look at the lovely gleam on all the polished metal parts

In the "before" photos you can see that the finish looks very dark. In real life it looked almost black, and the surface was rough.  The old finish had both decayed and absorbed considerable dirt over the last 100 years.  Much (but not all) of it had to go.

All of the myriad decisions about what to do with these old machines are influenced by personal preferences--both my own, and the owners.  Sadie and Patricia wanted it to be pretty.  I don't like machines that have had all of the character sanded off.  Plus I don't really trust myself with sandpaper.  Obviously the cracked and peeled and just generally ruined top had to be replaced with new veneer.  But on the rest of the cabinet and bonnet I used denatured alcohol to remove a great deal of the old finish.


The bonnet was black with age and had fallen apart.  I glued and clamped it and let the glue dry overnight.  I sloshed some denatured alcohol on with a soft cloth, let it sit for a bit and scrubbed it off with 0000 steel wool.  I used a toothbrush to get into the nooks and crannies.  I repeated this process until it looked like mahogany rather than black dirt.

original drawer, black with age and dirt, corroded drawer pull
One of the drawers was broken when it came to me and the other one was completely missing.  I found a decent enough match on eBay, but in oak instead of mahoghany.  I sanded it it well, attempting to remove all of the old finish (taking this process father than my usual approach), and then applied the red mahogany stain.  Looks pretty good.  Not perfect, but I doubt anyone would notice anything different if they were not obsessively looking.  The drawer handle is slightly different also, but again it is close enough.

Can you spot the differences in the drawer finish or handles?  Neither can I.

Here's a warning, though, if you are searching eBay or any other site for a replacement Singer drawer.  Not all Singer drawers are created equal, and it is not just the difference in the wood.  I have several spare drawers here, but did any of them fit?  Of course not.  The dimensions were different.

I used the alcohol + steel wool process on the entire cabinet and original drawer.  Then I went over everything with Howard's Restor-a-Finish in mahogany, just to even out the color.  I did all of this before we replaced the veneer because I did not want any stray dirt, stain, or chemicals to contaminate the nice new veneer.


And at this point I owe you all a huge apology.  I began this project with the firm intent of documenting and photographing every aspect of the restoration.  Then December happened and I decided that I had a good chance of finishing it and getting it back to Sadie and Patricia before Christmas.  And I completely forgot about the photos.  We did take a few as we delivered it.

But there are no pictures of staining process.  I dithered about doing this for a couple of months after Dexter applied the veneer (see last post).  I was terrified.   I had tried using stain before to even out the color on old beat up pieces, and wasn't too thrilled with the results.

It turned out to be very easy and worked beautifully.  I only stained the new veneer.  Lightly sanded it with 220 grit, then wiped it down with mineral spirits and then a tack cloth.  Tested three different colors of stain on scrap pieces of the veneer.  "Red mahogany" was the right color.

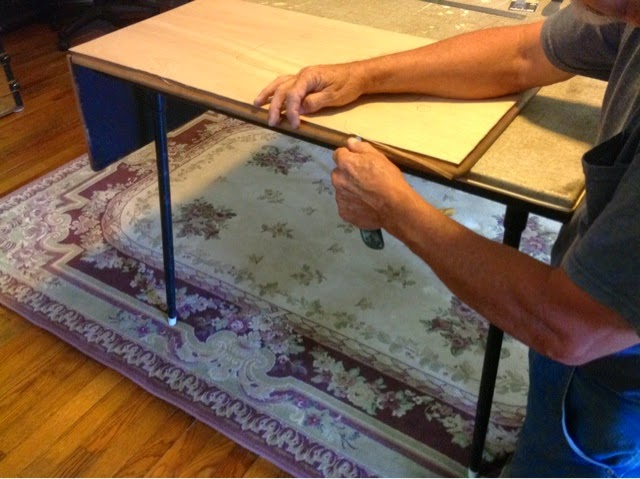
You can see the naked un-stained veneer at the top of the photo

Tests on the scrap piece showed that two coats were better than one, but I saw no difference between two coats and three.  I followed the directions on the can.  Painted it on with a disposable sponge brush, let it sit for 15 minutes, wiped it off.  Let it dry 24 hours and then repeated.

I followed up the stain with tung oil, which is my favorite finish BECAUSE it is super easy and I really know almost nothing about furniture refinishing.  Wipe it on, wait a bit, wipe off the excess, wait 24 hours and do it again.  All the experts say to sand in between coats.  Did not work for me and I will never do it again!  I ended up sanding right down through the stain which meant that I had to restain that part and then put more tung oil on it.  Like I said, I'm not very good at this.

It does need SOMETHING  to smooth out the surface.  So if the sanding does not work, what does?  0000 steel wool (pronounced Four Ought).

Pull a scrap off one of the wedges in the pack
It smooths off the tiny bit of roughness without the danger of messing up what you have already done.  Wipe down with mineral spirits on a soft cloth, and follow up with a tack cloth.  I ended up with three coats of tung oil on this piece. On the last coat, I applied the tung oil over the entire piece, not just the newly veneered top.

The final step was a coat of Howard's Feed N Wax, which I also recommended to Sadie and Patricia as the maintenance product for the cabinet.  It produces a lovely luster.

I am not advertising or promoting any of these products, just sharing what I used and giving you my unpaid opinions about them 


So, folks, that's how I did it.  I do not claim it is the RIGHT way to do it.  But it worked for me.

And the same pictures that you have already seen, again.  Because they are SO worth looking at.   But really because I just did not take enough pictures.

The angles of the photo creates different shades of color but if you compare the top of the bonnet with the newly veneered cabinet top you will see that the color match is flawless.


Next post:  Paint and decals, and I DID take pictures of that!  See you soonish.

Saturday, January 17, 2015

VS2 Resoration: Veneer


The continuing saga of the complete restoration of a Singer VS2.  See the previous post for more details.

And a warning:  if you don't like taxidermy, don't read this post.  What does taxidermy have to do with veneer?  Nothing, but there is plenty of taxidermy coming up for your enjoyment.  My personal favorite is the coyote.

THE CABINET


The veneer on the top of the cabinet was discolored, split in places and missing in others.


I did strip off the original finish first (using Citra Strip) to see if it was salvageable.  The grain on the old wood just cannot be matched today.


But I decided that although I could fix it up, it was too far gone to ever look terrific.


I had carefully checked with owners Sadie and Patricia before I began to find out if they wanted a conservation job (fixed but showing the wear and use patterns) or a restoration (fixed up to look as good as possible).  They wanted it pretty!  The original wood was never going to look pretty again, so I consulted my friend Myra and her husband Dexter, who have successfully replaced the veneer on old treadle cabinets before.  They advised me on what to get and where to get it.

So I took a piece of the bonnet top to The Hardwood Store in nearby Gibsonville NC.  You can order from them online but because I don't know much about wood I wanted to consult them in person.  The store clerk confirmed that it was mahogany.  Most of the treadles I have restored have been oak, but this one is clearly much older and it didn't look like oak to me.  I ordered a 2' x 8' roll of peel and stick mahogany veneer and had it shipped to me.  It arrived THE NEXT DAY.  Impressive.  The roll is enough for two treadles with bits left over.

I had never done any veneer work before so I worked out a barter with Dexter where he would both do the work and (even more importantly) teach me how to do it.  In return he got my late husband's Sennheiser cordless headphones.

Before taking it over to Dexter I fixed the loose veneer on the bottom by gluing and clamping.  There were several areas that needed it, the photo only shows one of them.  Elmer's wood glue does the trick.

BTW, when you are gluing veneer down, clamps are an ABSOLUTE NECESSITY.  Just weighting things down with heavy things is NOT going to do it.  My mission in life seems to be to make as many mistakes as possible and this was one of them--my first restoration was a family treadle and the reglued veneer on that one has ripples in it from not using clamps on it.


I filled in the missing area of veneer on the bottom with wood filler.  The photo shows a jar of wood putty which I discovered is NOT the thing to use.  It never hardened.  I think it is just for tiny holes like old nail holes.

DON'T use wood putty!

I had to scrape it all out and clean it all off before replacing it with wood filler.  That dried nicely and I was able to sand it smooth.  The whole point of repairing the bottom of the cabinet, which no one will ever see, is to get it smooth so that the person using the machine will not get their clothes snagged on a rough surface underneath.

Notice that some of the holes go all of the way through at the same width and some of them don't.


I also popped all the hardware out of the top so that the veneer could be applied.  Then I took it over to Dexter and he prepared it for the re-veneering.  (No photos of this part.)  He carefully sanded off all of the old glue and got the surface smooth.   Then he sealed it with polyurethane varnish.  He says that you have to put enough coats on so that there are no longer any dull places showing.  If it is not completely sealed, the veneer will not adhere properly.  It took three coats of the poly.

We worked in Dexter's spacious man-cave, and we had plenty of supervision.  These are only a few of the supervisors.  I will show you more of them as we move along.


We talked about the fact that some of the holes are smaller on the back then they are on the top.  I offered to make a paper template of the entire top.  Dexter said to wait and see if he could get all of the veneer off in one piece, in which case we could use it as the template.  I never dreamed that this would actually work.  I have removed veneer before, and it was a highly destructive process!  But in this case the veneer was pretty loose all the way around and he got all of it off by sliding a putty knife in between the veneer and the wood beneath. Only one tiny piece broke off.  Pretty neat, huh?


The major crack in the veneer went through to the wood below.  I asked if we should fill it in with wood filler, but he said no.  If the filler expanded later it would push up on the veneer.


He laid the old veneer on the new veneer and traced around it with a pencil, and allowing for the missing pieces that had cracked off on the edges.


Then it is a fairly simple matter to cut the veneer with ordinary household scissors.  Cut OUTSIDE of the pencil line.  You want it a smidge too large because you will sand it down to fit properly soon.  He held it in place while Myra cut it.


The peel and stick process is also easy, but it IS necessary to be precise, and it is a two-person job.  Dexter first peeled back about one inch of one corner.  He stuck this in place and then made sure that it was lined up properly.  At this stage it is easy to make corrections.  When he was confident that it was aligned correctly Myra peeled about a hands-breadth at a time, and then he smoothed it down firmly with his hands.  


Peel,  smooth, peel, smooth, until it is completely applied.


Dexter then trimmed off the excess with a carpet knife with a new blade in it.  He tried a few inches in both directions before deciding how to tackle it.  Even though the long edges ran with the grain of the wood, he said that it will obviously be easier to cut going in one direction than in the other direction.


Hold the blade at an angle because the edge should be beveled.


The coyote that did NOT get to eat the chihuahuas.

DEXTER'S SECRET WEAPON.  Do you recognize the object below?


If you said "Callus remover for your heels", ding ding ding, you are correct!  He finds a metal file to be too abrasive--it tears up the edge of the veneer.  He also likes the callus remover because it is plastic around the edges and will not damage the edges of the wood below the veneer.


Use the callus remover on the first pass to remove the roughest spots.  Follow with a sanding with 100 grit sandpaper.  Then a final sanding with 220 grit to make it all smooth.  He used a back and forth motion perpendicular to the edge, like shining shoes.  Does anyone shine shoes anymore?


another supervisor


He used an exacto knife to punch a little hole though from the back in the places that needed to be cut out.  You do this in case the marked holes on the top are not in exactly the right place.


From the top side, he cut from the punched holes to the outside of the openings in several places, then carved around the circles.  You can see in the photo below that he was right to be cautious about the placement of those pencilled circles.


Finish up by sanding the edges of the openings.


He was careful to be sure the grain lines matched as he placed the veneer on the extension leaf.  Then it was the same peel and stick process, followed by sanding the edges.


A final light sanding of the entire top removed the remaining pencil marks and prepared it for staining.  All it needs before that is a light wipe-down with mineral spirits.


Eh, voila!  Perfection!


Wonder why all the photos of Myra and Dexter do not show their faces?  Because they requested it that way.

And even more supervisors.  And I did not even show you all of them.

Next post will cover staining and re-assembly.


Tuesday, January 6, 2015

VS2 Restoration: The Early Months


1891 Singer VS2      Before

That is not dirt, folks, that is rusted out metal.

and after


In this series of posts we will explore the complete restoration of a Singer VS2.  I have planned for a long time to write up a fairly complete documentation of a project like this, and was just waiting for the right machine to come along.  Today's post shows the "before" pictures and discusses the restoration of the cast iron treadle.  The rest is coming soon, I promise.

This is what I decided to do, based on what the owners of the machine wanted me to do.  It is not the right way, the only way, or the best way.  I'm not promoting any particular products or techniques, just sharing my results with you.

Background:  My daughter has fabulous neighbors (Herman and Sadie) who have done a lot for her.  I have been very thankful to know that she has such great and supportive people living next door to her, and had been looking for a meaningful way to say "thanks".   Somehow baking a loaf of bread just was not enough.

Then Sadie's sister Patricia retired and moved in with them and brought with her their grandmother's treadle.  Aha!  I volunteered to restore it for them.  Patricia wants to sew with it.  The absolutely perfect project.

Assuming that some of Sadie's friends and relations will read this, let me make one thing absolutely clear up front:  this is what I do for FUN.  You may be tempted to think:  Oh My Gosh, what a horrible lot of work!  But it is only work if you don't like doing it.  For me this is FUN.  The longer it takes, the more time I spend having FUN.


BEFORE
The machine looked pretty bad.  The irons had rust and corrosion.


 The veneer on the cabinet was peeling up and had missing spots.


One drawer was missing.  The other drawer was present, but completely unglued and the bottom was split.


The bonnet had also come apart.


The ornate drawer pull was corroded.  And the top of the drawer had a missing corner.


The base of the head was rusted and corroded, and some of the bed decals were gone.  Literally gone, because they had gone with the paint when the paint flaked off with the rust.


The chrome plated metal parts had rust and corrosion, which also means that some of the chrome plating was gone.


On the upside was the most important fact of all:  their grandmother had sewed on it regularly and kept the important working bits maintained (simply meaning that she brushed the lint out and kept it oiled).  How do I know this?  Because in spite of all that obvious wear and tear, both the irons and the head were moving absolutely freely.

And that is the truth and beauty of these old machines.  Take just the slightest bit of care of them, and they will last for centuries.  Literally, centuries.  We kid ourselves by thinking that civilization inevitably advances.  What are we creating now that will endure for centuries?  I can't think of anything.  Not anything positive anyway.  Pollution?  Species extinction?


THE IRONS:  Cleaning the irons

There was 130 years of dirt on these irons.  My guess is that it had been kept in the kitchen a good portion of that time.  I have seen machines with this furry coating of dirt before.

Think of the dirt in such as case as tree rings.  Decades upon decades of accumulated dirt.  You will never get it off all at once, no matter how strong the cleaner you use.  Well, maybe sandblasting would do it.

I removed one of the legs at the beginning, which left the machine still standing but also gave me much better cleaning access to the flywheel and all of its workings.  By the time I finished I had taken both legs off of it.  They were each held on with two large bolts and came off fairly easily.

legs off, propped up on a metal table


I sprayed it with Awesome from the dollar store, recommended by Myra.  Working on one section at a time:  sprayed it on then immediately scrubbed it with a thing like a brass toothbrush.  Gave it another spritz and wiped it off with a paper towel.  It literally came off black at first.  And this was really black, a coal black, darker than I have seen before.  Made me wonder if a coal stove was in the kitchen.  My great-grandmother grumbled every time she did any baking in her electric stove.  She said it never baked as well as her old coal stove had done.  Sadie and Patricia later confirmed that their grandmother also had a coal stove.  I love antique sewing machine investigations.

Repeated the Awesome/scrub/wipe three or four times (many more times for the joints), each time getting less.  But it was still coming off brown on the fourth wipe.

And eh, voila!  The logos on the sides still have some of their original gold paint.
there are some traces of the original gold paint but much of this is rust

And this is just phase one of the cleaning.  Removing the bulk of the grime.

The 80% principle

At each phase of the cleaning, the goal is to remove 80% of the dirt that is there.  Then move on to the next phase.

For phase two, I got out a hand-held steamer.  Chose a small section of the cast iron at a time, ran the steam over it, and then wiped it off with a paper towel.  Did this twice.  We're down to a light brown stain on the paper towels by now.

can you see the steam coming out?

After the furry coat of dirt has been removed, the irons are revealed.  About 50% of the paint is gone, and there is some rust on the bare iron.  There are spots where the original casting was bad (just guessing) creating jagged spots.  But the good news is that what I originally thought was corrosion was just peeling paint.  There are only a few tiny spots of corrosion.

Phase three was the Dremel tool.  Wire brush attachments removed obviously flaking paint.  I don't need to take it all off because the new paint will cover up lots of imperfections.  But the paint that is left needs to be holding on and not ready to jump off!


The logos on the sides got more attention.  A diamond tipped tiny cone shaped bit cleaned out the details.  I have painted these before and the crisper the logos the better the final paint job will be.

The pitman is now revealed to be made of wood, a feature only found on older Singers.  The pitman is the rod connecting the pedal to the flywheel.  Later pitmans were made of cast iron.


Doing all of this is tremendously satisfying.  The dirtier it is, the more fun it is to reveal the bones of the machine beneath.

Phase four:  Denatured alcohol and steel wool
After all this cleaning, the irons were still slightly tacky with a remaining film of grease, but the final scrub down with denatured alcohol and steel wool (twice) got it clean enough.  The goal is to have a clean surface that the new paint will adhere to.


I did this over four days right after Hurricane Arthur had passed by and left us some fairly cool, dry weather.  And although all of the restoration is more fun if you can do it outside, this is the only part that ABSOLUTELY has to be done outside.  The dirt that drips down from the cleaning products, and the dirt that flies around from the scrubbing is something that you don't want in your house.

Painting the irons

My favorite product for painting treadle irons (well, OK, the only one I have ever used) is Hammered Rustoleum paint in black.  I have a can that is more than ten years old but was only opened a year or two ago.  Hoarding, anyone?  The color is more of a dark graphite gray than black, and I think this slightly softer color is more attractive with an antique machine than a strong black would be.


Several people have asked why I don't use the same Hammered Rustoleum in a spray can.  I like painting, and I like the total control I get with a paintbrush.  If you sprayed you would have to tape off all the joints where metal moves against metal.  With a paintbrush I just carefully avoid them.  It's just a personal preference.  I'm willing to believe that spraying IS easier and faster, but I like using the paintbrush.


To touch up the gold logos I use a Sharpie gold metallic PAINT pen.  Not the regular Sharpie metallic marker.  I tried several different types of gold paint on an earlier treadle restoration and this one was the best and quite easy to use.


If you mess up, and I certainly did my share, just paint over the mistake and try again.


When Sadie and Patricia originally turned the machine over to me, I asked them what level of restoration they wanted.  They told me they wanted it pretty, as pretty as I could make it.  Over the next several posts I will show you how I leaned to replace veneer, and how I overcame my fear of wood stain.  I will reveal to you just how I obtained a set of Singer VS2 reproduction decals MONTHS before they came on the market.  And I will continue the ongoing love affair with Hammered Rustoleum paint.

I also need to get back over to their house to take many more "after" photos.  In my rush to finish it up so that I could deliver it on Christmas Eve I forgot to take pictures of the finished machine in its cabinet, on its treadle base.  Made my self-created deadline, but only have a few photos taken in their front hall.